Tips for grabbing Web videos using a browser
Complete Coverage


If you’ve spent more than a couple of hours on the Web you understand that the thing is choked with videos—from YouTube to Vimeo to news and entertainment sites. There’s so much, in fact, that it’s hard to watch everything you want to when you’re sitting down in front of your computer. And because there is, it’s not uncommon to seek ways to capture that video for later viewing on other devices or when an Internet connection isn’t available.
Capturing Web video can be a one- or multi-step process, depending on how the original content is encoded and protected. For example, it’s fairly easy to download MPEG-4-encoded content and play those videos on your Mac and iOS devices because MPEG-4 is natively supported on these devices. However, many websites continue to offer videos encoded in the Flash (flv) format. While you can play these videos in a browser or with a third-party application such as the VideoLAN client (or in QuickTime Player if you’ve installed the Perian plug-in), you must convert these to a format compatible with iOS devices. Easy or difficult, it’s possible to capture just about any video on the Web. Let’s explore how.
Downloading files with a Web browser
If you’re using Safari you’ll find that there’s no obvious command for capturing streaming YouTube videos, but it can be done with the browser’s built-in tools provided that you’re downloading a Flash file. For example, navigate to a YouTube video you want to capture and start it playing. Press Command-Option-A to produce Safari’s Activity window. In this window you’ll see the name of the video followed by the word YouTube. In the list of links below look for an entry of several megabytes that appears to be loading. Option-double-click on it and it will download to your Mac as an flv file. As mentioned earlier, you can then play this file with a third-party tool. Unfortunately, you can’t download MPEG-4 files using this method. For those files, turn to Firefox or a third-party tool.
Speaking of Firefox, its users have a better option thanks to the free DownloadHelper extension. Once you’ve installed the extension, a DownloadHelper icon appears in Firefox’s address bar at the top of the browser window, or in the status bar at the bottom of the browser window (we found different behavior on different Macs). Start playing a video and click on the icon and you’ll see one or more listings for the video. If you’re looking at a YouTube video (the extension supports downloads from many different sites) you’ll see multiple listings—some in Flash format and others in MPEG-4 format. Choose one of the MPEG-4 versions (standard or high definition, for example) and it downloads to your Mac, ready to play in iTunes, QuickTime Player, or another video player of your choosing. If a site offers only one version of the video—MPEG-4 or Flash—you’ll see the option to download only that file.
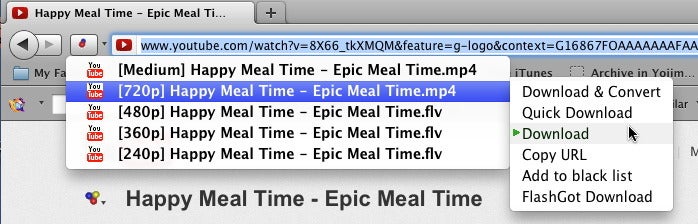
DownloadHelper
If that file is in the MPEG-4 format, you’re set. Just download and play it. However, if it’s a Flash file you may wish to convert it so you can play it in iTunes and on your iOS devices. DownloadHelper can do that but only if you’ve installed the FFMpeg or Mencoder libraries—a process that requires some knowledge of the Terminal application and the wherewithal to track down the correct library builds. Otherwise, there are many tools to convert your videos.
Third-party tools
Regrettably, not all websites provide video in MPEG-4 format. If you want to view downloaded flv files with an application that doesn’t support Flash, or watch them on your iOS device, you must convert them. There are a variety of ways to go about this.

Video Monkey
But first a word on how to not go about it. If you search the Web for video conversion tools, you’ll find many of them. Most aren’t worth your while. These are poorly-built applications produced by companies that promote these tools via spam and fake reviews. Worse yet, some of them cost upwards of $40, which is far too much to pay when there are some perfectly fine tools that do the job for free.
One of those free tools is Video Monkey (), an application that borrows heavily from the beloved-but-now-discontinued VisualHub. Once you’ve downloaded a movie using one of the methods described earlier, just launch Video Monkey, drop your movie into its window, and choose the output device or video format you want to use. Video Monkey offers batch conversion and includes a quality slider. It can also add your converted movies to iTunes when it completes its work.
Shedworx’s free Smart Converter (Mac App Store link) is another good choice. It too can convert flv videos as well as audio files. Just drop your videos into the Smart Converter window, choose a preset (Apple TV, iPad, or iPhone/iPod, to name a few), and click Convert. The free version of Smart Converter doesn’t support batch processing however. If you want that, turn to the $10 Smart Converter Pro (Mac App Store link).

Videobox
Although $15 isn’t free, it’s not terribly expensive either. If you’d prefer to capture and convert in one step, take a look at TastyApps’ Videobox. To use Videobox, just drag the URL for a video you want to download into the Videobox window. A mini-browser window appears that includes the contents of the page the video is posted on, and an entry for the video appears in Videobox’s window. Click on the Download icon and a Save As window appears. From the Output For pop-up menu, choose the format you’d like to save the video in—iDVD/iMovie, iPad, iPod Classic, iPod touch/iPhone, or Mac Viewing are some of the choices—and click the Save button. (Click the Show Settings button in this window and you can further adjust the video settings.) Videobox downloads and then converts the video.
Brute force
And then there’s the ugly way—using a screen capture utility to grab video and audio in real time. You can do this with QuickTime Player by choosing File -> New Screen Recording, but you won’t be able to capture the video’s audio until you install Cycling ’74’s free Soundflower. To do that, download and install Soundflower, open the Sound system preference, and choose Soundflower (2-ch) in the Output tab. Within QuickTime’s Screen Recording window, click on the triangle and under the Microphone heading choose Soundflower (2ch). Start the recording and then start the video playing.
The results from a QuickTime Player capture can be choppy, even on a fast Mac. In such cases, you may want to turn to a dedicated screen capture application such as Ambrosia Software’s $69 Snapz Pro X, Shinywhitebox’s $30 iShowU HD Pro, TechSmith’s $99 Camtasia 2 or Telestream’s $99 ScreenFlow 3 ().

No comments:
Post a Comment