If you’ve just come to the Mac from a PC you may have wondered where Microsoft got the name “Windows” for its operating system. Without delving into the politics of the thing (because some people are still sore about it), let’s just say that Microsoft was inspired by one of the Mac OS’s most prominent features: virtual windows that gave users a visual metaphor for the way their files were organized on their computers. Microsoft, much to Apple’s chagrin, thought this a wonderfully descriptive name for its graphical user interface (known by its initials, GUI) and so Microsoft Windows was christened.
Let’s just go over this “visual metaphor” business in a bit more depth. As I’ve mentioned in a past column, much of the Mac GUI is based on analogies: You have a "desktop," and "folders" on that desktop contain other folders as well as "files." In essence, the OS X interface offers a virtual filing cabinet for your stuff.
In truth, under the hood is some variety of storage media (a hard drive that stores its data on magnetized platters or a solid state drive that stores information on computer chips) with information scattered all over it. If it was possible to look at this media with a magnifying glass and see all the bits of data on it, you wouldn’t see files and folders all neatly lined up. Rather, one portion of a file would be here, another bit over there, and yet one more bit way over yonder. And its host folder would be somewhere else altogether. So, all this talk of folders and files is really just a way to simplify a complicated reality by packaging it in a more familiar form. Scattered bits and bytes of data written to media we don’t understand. Files and folders, we do.
But that file and folder analogy doesn’t hold up for long. If you have a real folder purchased from the stationery store, open it. What do you see? Right, the less-glossy inside of the folder and anything that the folder contains. Okay, so now do the same thing with a Mac’s virtual folder and what happens? You do not see a drawn representation of the inside of a folder and the paper files within it. Instead, you spy a rectangular shape with stuff in it. Or, put more succinctly, a window.
See? Analogy completely busted. Although it’s perfectly legitimate to say, when looking at this window, that you’re peering inside such and such a folder, the thing you’re looking at is a window. Like pronouncing Massachusetts' Worcester,wooster, you accept it and move on.
So how do you go about producing one of these things? There are a couple of ways. If there are currently no open windows on the desktop, simply click theFinder icon in the dock. (This is the first icon, which has the smiling face that seems to be split in half.) A new window will open. If a window is already open and you’d like to create another one while using the Finder application, you can click the File menu and choose New Finder Window. Again, a new window will appear. Now, let’s see what’s in that window.
 The anatomy of a Finder window
Top o’ the window to you
Along the top of the window you’ll see a variety of items (follow the illustration to see where they are). They include:
Apple tells us that the green Zoom button allows you to maximize the window’s size. If you have a bunch of items in it, clicking the Zoom button will expand the window so you can see as much of its contents as the limits of your Mac’s display will allow. In truth, the Maximize button is a little more complicated than that but this isn’t the proper place to go into all its vagaries. You can read my What Exactly Does the Finder’s Green Button Do? if you’d like more details.
You can use these buttons only when you’ve already traveled through a portion of the folder hierarchy. You can’t very well open a brand new folder as we’ve done and expect either the Back or Forward buttons to do anything. You haven’t navigated anywhere so there’s nowhere to go “back” to. Likewise, as you haven’t yet visited another folder within this window, there is no forward as far as the Mac is concerned. Providing a strong hint that these buttons do nothing in such a case, the buttons will be grayed out. If one or the other is black, it means you can click on it to navigate back or forward, depending on your previous travels within this folder.
Up to this point I've avoided providing tips, but I think you can now be trusted with one. Hold down the Command key (the one just to the immediate left or right of the space bar) and click the window name at the top of the window. A menu will appear that shows you the hierarchical path to the folder you're currently working with. This is one way to move up the hierarchy when you can't use the Back button.
The second button represents List view. Click it and the contents of the folder appear, by default, in an alphabetical list.
Next is Column view. This view better shows the OS’s hierarchical structure. Click it and you’ll see the contents of the current folder on the left of the contents area. If there’s a folder within that first column, select it and you’ll see that folder’s contents in the next column. If there’s a folder in that next column, click it and, you guessed it, you’ll see that folder’s contents in the column to its right. And on and on. When you finally select a file in this view, you’ll see a preview of it along with some other file information in the last column.
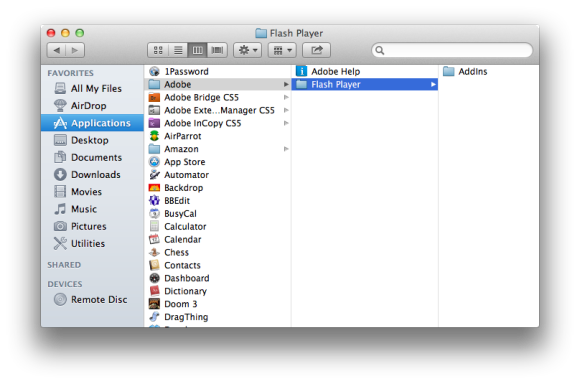 Column view allows you to more easily see the folder hierarchy
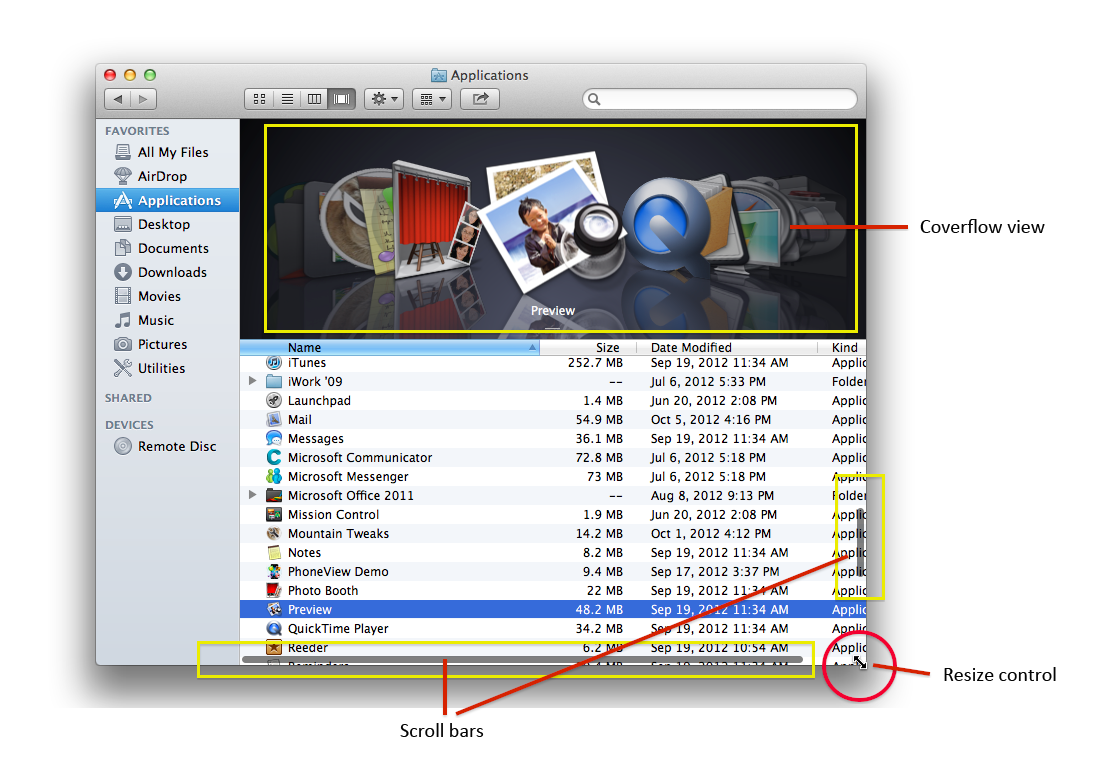
Finally, the last View button is for Cover Flow view. This was inspired by a similar view in Apple’s iTunes music application. In this view you’ll see a carousel of icons in the top portion of the contents area and then a list of items below (see illustration below). Click an icon in the top area and the associated item will be highlighted in the list underneath the carousel. Similarly, click an item in the list and the associated icon will move to the center of the carousel. If your Mac has a trackpad (or you’re using a wireless trackpad with it) you can quickly sweep through the carousel by placing your cursor within it and dragging two fingers to the left or right. If you’re using a mouse, click and drag on the lozenge-looking-thing that appears in the bar (called the scroll bar) below the carousel.
One more tip. If you're looking at items in List view, you can click on the column headings above the list (Name, Date Modified, Size, and Kind, for example) to quickly sort the list using that heading.
Sussing the sidebar
On the left side of a Finder window you see a gray pane that includes at least a couple of grouped items. Let’s run through them.
 A Finder window's sidebar
Click All My Files and you can view all your readable files, sorted by file type. This All My Files view includes not only files that you’ve stored on your Mac but also any files you’ve saved to iCloud. We’ll look at saving files in another column.
AirDrop is a way to easily transfer files between Macs on the same local network.
Under the Devices heading you generally see any storage devices that are attached to your Mac. This can be a USB storage drive plugged into your Mac’s USB port (one of those USB flash drives you put on your keychain, for example, or some larger hard drive). If you’ve inserted a CD-ROM or DVD disc into your Mac’s media drive, that disc will be listed under Devices. If you’ve configured another Mac to share its media drive with yours over a network you’ll see Remote Disc listed under this heading. Any disk images that you’ve mounted on your Mac will also appear here. (We’ll discuss all these storage options in the future.) In some cases, certain kinds of iPods you’ve connected to your Mac will be listed here.
The triangle-with-line-under-it icon that appears next to any removable media (that USB flash drive, for instance) is the Eject icon. Click it and that media is disconnected from your Mac. In the case of a CD or DVD, it’s physically ejected from the Mac. For drives like external hard drives and USB key drives, clicking this icon and then seeing the name disappear from the Devices list means it’s safe to physically disconnect the device from your Mac.
What you don’t see
There are a couple of other things in the window that either you won’t or may not see. The first is scroll bars. Suppose that you have a window that contains hundreds of items. How are you supposed to access those items if only a handful of them appear? That’s the point of scroll bars.
At one time the Mac OS had scroll bars that were always visible—they appeared as blue gumdrop-looking things on the side and bottom of a window if that window had more items that could be displayed in the window. Recently, Apple has chosen to get rid of those always-visible scroll bars.
By default, you see those bars only when you scroll within the window with your trackpad or the scroll wheel on your mouse. Do this and you see gray bars on the side (and on the bottom if the contents is wider than the width of the window). Those bars give a proportional representation of how far you’ll need to scroll to get to the top, bottom, or right side of the window. If you have 50 items in a window, for example, and can see 30 of them, the gray part of the scroll bar will be quite long, indicating you can see most of its content. If, instead, that window has 1,000 items, the gray bit will be quite small, telling you that you have a long way to scroll.
The other thing you don’t see is a way to resize the window. Again, in the old days, the bottom-right corner had a small square used for this purpose. Click and drag that square and the window changed shape, collapsing or stretching in the direction you moved the cursor. Today, that square is gone.
 Drag a corner or side to resize a window
To drag-resize a window you now place your cursor at any edge or corner. When you do, your cursor will turn into a two-headed arrow icon, indicating that when you click and drag, the window will expand or collapse in this direction. So, place your cursor at the right edge of the window, click, and drag the window to the right to make it wider. Drag to the left and it becomes narrower. When you drag on a corner you find that you can reshape the window both horizontally and vertically, making it the most flexible option.
Window behaviors
This has gone on quite long enough, but before I give you a hint about next week’s column, a couple of pointers about how windows behave.
First, you can open more than one window at a time. For example, you have one window open now. Click the Finder’s File menu and choose New Finder Windowto create another window. It will open in the default view (which, again, is All My Files). In this window click the Downloads item in the sidebar. You now see the contents of the Downloads folder—if you’ve just configured your new Mac, this folder will contain a single About Download file. Your original window will still display the contents of your All My Files directory.
You can move files between folders. Try this: In the Downloads window that’s still open, click the About Downloads file and while still holding down the mouse button or trackpad, drag that file to the Documents item in the sidebar. When you do, the file’s name will turn blue and the Documents item will be highlighted. Let go of the mouse button or trackpad and the file disappears from the Downloads folder. Yet it’s still in the All My Files folder. Why? Because it’s still one of your files, it’s just been moved. (Again, the All My Files window is special in that it's not really a folder that contains specific items. Rather, it's a directory of the files you've created, which can be stored just about anywhere on your Mac.) To see where it’s gone, click on the Documents item in the sidebar. There it is. If you like, you can drag it back into the Downloads folder.
Also, the sidebar's Favorites area isn’t reserved strictly for those items Apple believes are favorites. You can add folders of your own to this area. Try this: Click the Applications item in the sidebar. In the content area you’ll see all the items in your Applications folder. Scroll down to the bottom of the window and locate the Utilities folder. Drag this folder so that it appears below the Pictures folder. As you drag you’ll see a blue line indicating where the folder will be placed. Let go of the mouse button or trackpad and a Utilities item will appear in the sidebar. Notice that the Utilities folder remains in the Applications folder. So, you haven’t removed the folder, you’ve just added a pointer to it to the sidebar.
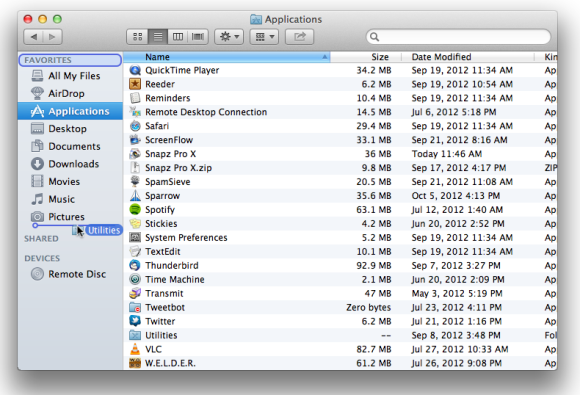 Drag to add items to the Favorites area
In the sidebar click the Utilities item you just added. Notice that the Utilities name now appears at the top of the window and within that window you see the contents of the Utilities folder.
You can also remove items from the Favorites list. To do that, hold down the Command key (remember, you’ll find two of them—each immediately to the side of the space bar) and drag the item to the desktop. It will disappear with a puff of smoke. Note that you haven’t deleted the original folder, just its pointer.
Go ahead and click All My Files to return to the default new window view. Just to be sure you’ve understood what we’ve done so far, click the red Close button in the top-left corner. There, the window is now closed. And so is our overview of windows basics on the Mac.

No comments:
Post a Comment