Reader Amy Campbell has all the right reasons for extracting data from an iPhone. She writes:
A Mac-using relative recently passed away, and there are some SMS and voicemail messages on her phone that we’d like to have copies of. I don’t see any way to extract those things. Is this possible?
It is, and if you have access to her Mac, you can do better still. Here’s how:
When you back up an iOS device to your computer, SMS and voicemail messages are part of that backup. The backup resides in youruserfolder/Library/Application Support/MobileSync/Backup. Don’t bother rooting around in that folder, as you won’t find anything usable unless you’re intimately familiar with SQLite databases; the files look like so much gobbledygook to most people.
Instead, turn to a tool that can extract the information you want, either directly from the phone or from one of the iPhone backups. For this kind of thing, I routinely turn to Ecamm Network’s $30 PhoneView.
If you’d like to recover information directly from the phone, plug it into your Mac using the sync cable. PhoneView will launch and show you a screen that looks a bit like iTunes. In the left column under the Data heading, you’ll see entries for Disk, Contacts, Notes, Call Log, Messages, Web, Voicemail, and Apps. ChooseMessages, and you’ll see a list of SMS and MMS messages in the second column. When you select a message, the contents of the conversation appear in a third column. To create a copy of that conversation, just drag the name or number from the second column to the desktop; it becomes a PDF file, and contains the entire conversation. Likewise, if you want to copy a voicemail message from the phone, select that entry and drag it to the desktop. When you do, the voicemail message appears as an AAC audio file that you can play in iTunes.
If you have access to this person’s Mac and their account, PhoneView can provide even more help. From PhoneView’s File menu, choose iTunes Backup and then, from the submenu, select View Call History iTunes Backups, View Message iTunes Backups, or View Voicemail iTunes Backups. The window that appears will list, in a pop-up menu, every iOS device backed up on that computer. Choose the one you want, and you’ll spy a list of backed-up data. Again, just drag whatever you like to the desktop to turn that data into something you can read or listen to.
The advantage of pulling data from an iTunes backup is that if your relative had multiple iPhones over the years, it’s likely you’ll find all the accumulated voicemail and SMS messages rather than just those stored on her last phone.
=========
http://www.macworld.com/article/2011465/mac-101-meet-the-finder.html#tk.nl_mwhelp
In the last Mac 101 column, you finished configuring your new Mac. At long last, it's up and it's running OS X Mountain Lion—you’ve arrived! But where exactly are you? And what’s all that stuff on the screen?
Your Mac is running an application (also known as a program or an app) called Finder. More often than not, you’ll hear it referred to as the Finder. Given its name, is it a tool for searching your Mac?
Not exactly. Way back when the Mac was first born, Apple used a desktop metaphor to help people imagine the way their files were organized. You could think of the Finder as your desk. Inside that desk were folders that held other folders or files. So, by opening a series of nested folders, you’d eventually locate the file (or document) you were interested in working with. So, in this way, the Finder earned its name: It was the starting point for finding your files.
But, as things have progressed, fewer Mac users think of it that way. There are far more efficient means for locating files than digging down through a lot of nested folders. And, with the last couple of iterations of the Mac OS, Apple is deemphasizing the notion of folder hierarchies anyway. (But that’s a topic for another column.) For the time being, just think of the Finder as the place you start when you first boot up your Mac. Now let's take a look around.
 What's where in the Finder
The menu bar
Starting at the top of the window, you find the menu bar. Yep, another metaphor. Rather than forcing you to remember a bunch of arcane computer commands (as was the case in prehistoric times), Apple organizes common commands in a series of menus. Click on a menu heading—Edit, for example—and you see the related options in a menu below. Select one of those commands, and it executes. So, for instance, click on a file, choose the Duplicate command from the Filemenu, and the Mac creates another copy of the file. I'll discuss menus and their functions in a future column. For now, we’re just taking a look around.
In the menu bar you see a number of items. Starting from the left, there’s the Apple icon. This is actually a menu. Unlike the menus to its immediate right, this one is represented by an icon rather than a word. Then comes the Finder menu. This menu is known generically as the application menu, meaning that it contains commands specific to the application you’re currently working with. If you are currently using iTunes, for example, you’ll see an iTunes menu in this same position—just to the right of the Apple menu—and in that menu you’ll find commands that apply to the iTunes application.
And then there are the regular menus—File, Edit, View, Go, Window, and Help. All of these menu titles (except Go) are commonly found in other applications. And that’s one of the beauties of the Mac OS. Thanks to things like common menu names and commands, you’ll have a certain sense of familiarity regardless of which application you’re using. If you need to copy something, for example, that command will always be found in the Edit menu. If you need help in just about any application, that’s exactly what the Help menu is for.
Moving to the right in the menu bar you see a series of icons that also represent menus. These menus often allow you to quickly change one of the Mac’s settings, saving you a trip to the Mac’s System Preferences application. The figure below includes the default set of icons found on a 2012 MacBook Air. Your menu bar icons may be different because some functions may not be supported on your Mac. I’ll explain in greater detail what the functions represented by these icons do in a future column. For now, here's the short and sweet description, starting from the left:
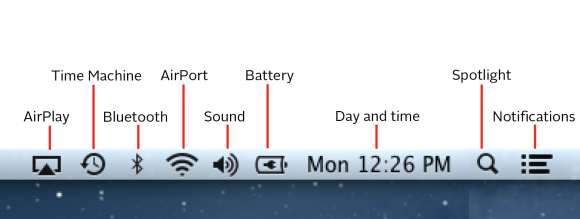 The menu icons on the right side of the menu bar
The desktop
That vast empty area in the middle of the Mac’s display is known as the desktop. Like a real desk’s top, you’re welcome to place items on this desktop, though Apple encourages you to place your files in more appropriate places—your pictures in a Pictures folder and documents in a Documents folder, for example, or on Apple's online syncing and storage service, iCloud.
As you’re just starting out, I’ll plant this seed: Place files where they belong rather than dumping them on the desktop. (And yes, we’ll talk about file management eventually.) Not only is it difficult to find files when there are hundreds scattered across your screen, but overloading the desktop with certain kinds of files can actually slow down your Mac.
The Dock
By default, at the bottom of the Mac’s display you see a long bar populated with a collection of icons. This is the Dock. By default the Dock holds these applications: Finder, Launchpad, Mission Control, Safari, Mail, Contacts, Calendar, Reminders, Notes, Messages, FaceTime, Photo Booth, iPhoto, iTunes, App Store, and System Preferences.
The Dock serves a couple of purposes. The first is that it acts as a way to quickly launch commonly used applications. Just click on an application and it either starts up (if it isn't already running), or the Mac switches to it (if it is). An application that is running (also known as an active application) will display a faint glow below the Dock’s application icon.
The majority of the Dock is taken up with applications. If you look closely, you’ll see a faint line near the right side of the Dock. The area to the left of that line is reserved for applications.
You can both add and remove applications from this area. To remove an application, just hold down the Option key on your keyboard (it’s two keys to the left or to the right of the spacebar) and drag the application out of the Dock. Its icon will disappear in a puff of virtual smoke. Don’t worry, if you do this you haven’t deleted the application from your Mac. Rather, you’ve just removed from the Dock the icon that represents that application. Basically you've removed the shortcut to the application, but the program still exists in the Mac's Applications folder.
When you launch an application that isn’t in the Dock, its icon will also appear in the Dock and have that faint glow beneath it indicating that it’s running. When you quit that application, it will disappear from the Dock.
If you’d like to add that or another application to the Dock in a more permanent way, just select it (from the Applications folder, for example) and drag it into this applications area. Its icon will appear where you place it and other icons will shift out of the way.
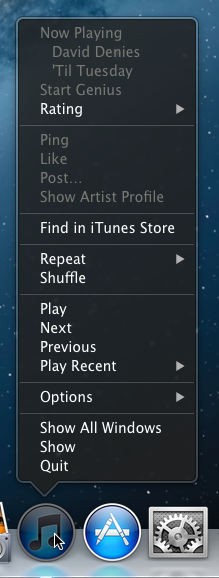 Click on an active application in the Dock to see options
The Dock can also alert you to things that require your attention. For example, if iTunes can’t find a track you’ve asked it to play and iTunes isn’t the application you’re currently working with, the iTunes icon may bounce up and down in the Dock so that you’ll switch to it to learn about the problem it’s having. Additionally, some applications will showbadges—red indicators planted on the application’s icon. Mail, for instance, will display a badge indicating the number of messages it’s received that you haven’t yet read.
And you can access some settings for active applications by clicking and holding on an application’s icon. For instance, if iTunes is running, you can click on its Dock icon and rate the currently playing song, pause playback, play the next or previous tracks, or shuffle songs. When Mail is active, you can ask it to retrieve new messages or you can choose to compose a new message.
To the right of the Dock’s faint line are, by default, two items. The first one—though it doesn’t look like it—represents a folder. Specifically, it’s a shortcut to the Downloads folder. When you download a file via Apple’s Safari Web browser, that file appears within this folder. Click on it in the Dock, and you see the folder’s contents.
These Dock folders can be confusing. By default, when such a folder contains just a few items and you click on it, the items pop-out in a fan list with the most recent items appearing at the top. When that folder has more than a few items in it and you click on it, those items appear in a grid. In a future column I’ll discuss customizing the Finder and talk about ways to make these folders show items in a more consistent way. For now, just understand that you may see items displayed in either a Fan or a Grid view. To launch a file in one of these views, just click on it.
Finally, at the right edge of the Dock is the Trash. When you want to delete something from your Mac, just click, hold, and drag it to the trash-can icon. If the Trash contains no files, it will change from a trash-empty icon to a stuff-in-the-trash icon and you’ll hear a dumped-something-in-the-trash sound effect. Like a real trash can, this one isn’t really empty until you do something to toss out the items in it. Rather it’s a holding area for items that you eventually intend to throw out for good and all. To really delete your files, click on the Finder menu and choose Empty Trash. A window will appear asking if you’re really sure you want to empty the Trash. Click the Empty Trash button to do exactly that. Otherwise, click Cancel and the items in the Trash will remain right where they are.
Once you’ve emptied the Trash, the items that were in it are, for all intents and purposes, gone. (There are some utilities that can retrieve them, but until you’re a little more up to speed on the ins and outs of the Mac, just assume they’re gone.) However, you can retrieve items if the Trash hasn’t yet been emptied. To do that, just click on the trash-can icon. A window will open that shows you the contents of the Trash. Drag the items you want to retrieve out of the trash to the desktop. You can now file them away.
This area to the right of the line isn’t intended only for the Downloads folder and Trash. If the area to the left of the line is for applications, this area is for everythingbut applications. If you have a folder you access routinely (the Applications folder, for example), you can drag it in here, and an icon representing it will appear. If you’ve minimized a window by clicking on its yellow button (something we’ll get to, I promise), it will appear in this area. If you have a file that you use over and over again—a text file that holds your personal diary, say—you can drop it in here as well.
There’s far more that you can do in the Finder—and we'll get to those things over time—but you’re now familiar with its major elements.
Next time:

No comments:
Post a Comment